

MSI laptops have gained a reputation as top-tier machines, excelling in both gaming performance and productivity enhancements. Whether you’re an avid gamer aiming to immortalize victories or professional requiring screenshots for work purposes, mastering the art of taking screenshots on an MSI Laptop is essential. This comprehensive guide will meticulously navigate you through the sequential steps to take a screenshot on an MSI laptop. Without delay, let’s dive right into the process!
Why would someone need to capture their screen?
In specific instances, there might be situations where retrieving essential data or visuals from a website through conventional downloading is not possible. In such scenarios, the solution lies in capturing a screenshot, which allows you to preserve the requisite information effectively. A screenshot serves as a snapshot method for preserving images or content displayed on your screen.
How to Take a Screenshot on an MSI Laptop in 4 Ways
Capturing screenshots on an MSI Laptop is an effortless endeavor. You can confidently employ any of the provided methods below to successfully accomplish this task.
Solution 1: Utilizing the Print Key (PRT SC) – Take a Screenshot on MSI Laptop
This method is effective in capturing screenshots on virtually all types of laptops. It stands out as the most commonly used approach by both inexperienced and experienced computer users for capturing screenshots on an MSI laptop.
1. Go to the screen you wish to capture
To take a screenshot, navigate to the specific window you wish to capture. Make sure your MSI laptop is in full-screen mode to capture the entire screen in the snapshot.
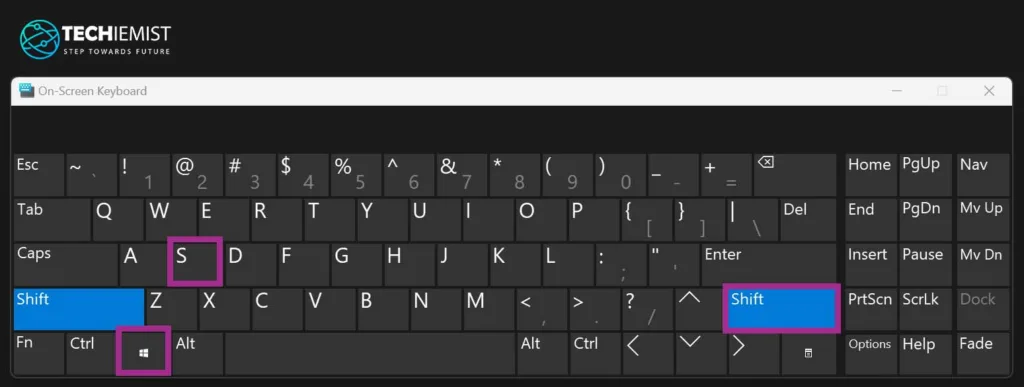
2. Press the Print Screen key
The designated key can be found in the upper-right corner of your keyboard. Its appearance might be labeled as PRT SC, which is contingent on your keyboard’s dimensions.
To capture your screen, simply press the Windows key along with Prt SC simultaneously. As a result, your screen will momentarily flash, effectively capturing the screenshot.

3. Locate the Screenshots
To effortlessly access your saved screenshots, just head over to the Pictures directory within Windows Explorer. You’ll find the designated ‘Screenshots’ folder, housing all the images you’ve captured. Make sure not to miss this essential guide on effectively annotating screenshots and images in Windows 11.
Solution 2: Using the Snipping Tool – Take a Screenshot on MSI Laptop
To effectively capture specific portions of your MSI laptop’s screen, utilizing the Snipping Tool proves to be a valuable solution.
Step 1: Launch the Snipping Tool
Access the Windows search feature and input ‘Snipping Tool.’ Proceed to select the primary search result. Subsequently, within the ensuing window, an icon resembling a pair of scissors will become visible. Upon clicking this icon, the Snipping Tool application will be initiated.
Step 2: Working with the Snipping Tool
Within the interface of the Snipping Tool window, an array of choices will be presented for your consideration. To initiate the process of capturing a screenshot, you’ll need to click on a new tab. As a result, an emphasized rectangular frame will manifest on your display. With ease, engage the left mouse button and proceed to move your cursor, thereby delineating the precise region you intend to capture.
Step 3: Save the Screenshot
Once you’ve successfully taken the snapshot of your choice across the tabs, proceed by clicking on the file. From there, opt for the ‘Save as’ choice and pinpoint your preferred destination on the laptop to store the screenshot.
Such is the process of capturing a screenshot using the integrated utility on an MSI laptop. Alternatively, you can explore the following approaches to achieve the task seamlessly.
Solution 3: Snip and Sketch – Take a Screenshot on MSI Laptop
Included within Windows 10 is the Snip and Sketch tool, designed for capturing screenshots seamlessly. This convenient utility offers a choice between a three-second or ten-second timer prior to capturing an image of your MSI laptop screen. To capture a screenshot using the Snip and Sketch tool on your MSI laptop, follow the steps outlined below:
Step 1: Launch the Snip and Sketch App.
To utilize the Snip and Sketch tool, simply press the combination of Windows + Shift + S concurrently. Following this action, a compact window will emerge at the upper part of your screen, presenting you with a selection of four choices.
Step 2: On an MSI laptop, take a screenshot.
Effortlessly capture the desired section of the MSI Windows screen by simply dragging your cursor over it. As soon as you release the cursor, a convenient pop-up notification will display the captured snapshot for your immediate review.
Step 3: Preview & save your screenshot
Users have the option to preview and store the captured screenshot as desired.
This is the operational process of the Snip & Sketch application. For individuals seeking to enhance and perfect the end result, turning to trustworthy third-party software designed for screenshot capture can prove to be beneficial.
Solution 4: Use TweakShot Screen Capture – Take a Screenshot on MSI Laptop
TweakShot Screen Capture stands out as the ultimate solution for screen capturing and photo editing needs, guaranteeing professional-grade outcomes. With its impressive array of features, users gain the ability to swiftly capture a variety of screen elements, whether it’s an active window, the entire screen, a scrolling webpage, or a specific rectangular region. What sets TweakShot apart is its integrated basic editing suite, encompassing tasks like cropping, highlighting, pixelating, and more. The software offers a range of compelling advantages:
- Tailored Screenshots: Users enjoy the flexibility to capture diverse screenshots according to their specific preferences.
- Mouse Cursor Inclusion: TweakShot empowers users to opt for including their mouse cursor within the capture process, enhancing the clarity of their presentations.
- Comprehensive Picture Editor: The built-in picture editor boasts essential editing capabilities such as cropping, resizing, and applying blur or pixelation effects, affording users greater creative control.
- Effortless Annotation: Annotating screenshots becomes a breeze, with options to draw arrows, lines, and annotations, as well as highlight crucial sections and trim images to perfection.
- Versatile Demonstration Content: TweakShot emerges as a brilliant ally for crafting educational and instructional content, facilitating the creation of demonstration videos and screenshots that enhance learning, teaching, and overall work efficiency.
- Specialized Color Picker: The software’s dedicated screen color picker facilitates color selection from both the screen and images. Furthermore, users can expedite their design workflow by swiftly copying color codes.
In summary, TweakShot Screen Capture emerges as a powerful and versatile tool that amalgamates screen capturing and photo editing prowess, equipping users with a comprehensive solution for an array of creative and educational purposes.
Frequently Asked Questions
Q1) How to take a screenshot on an MSI gaming laptop?
Learn how to easily capture screenshots on your MSI laptop by following these straightforward steps:
- Begin by launching the desired window that you intend to capture in your screenshot.
- Access the convenient “Gamebar” by simultaneously pressing the “Windows” and “G” keys.
- Utilize the dedicated screenshot feature provided on your MSI laptop.
- Locate the captured screenshot image effortlessly within the designated “screenshot” folder.
With these uncomplicated instructions, you’ll master the art of taking screenshots on your MSI laptop in no time.
Q2) How to take screenshots on a laptop?
Utilizing dependable screen capture software such as TweakShot stands as one of the most effective approaches for capturing laptop screenshots. TweakShot encompasses all the necessary tools for capturing diverse screenshots, recording videos, and performing subsequent edits with utmost reliability.
Q3) How to take a screenshot in Windows 10 with Snipping Tool?
Execute the following procedure:
- Simultaneously press the combination of the Windows logo key + Shift + S. As you select a specific region for your capture, the desktop background will dim.
- The default mode is rectangular; however, you have the option to select a different pattern if desired.
- Your snapshot will be instantly copied to the clipboard.
Q4) How to save a screenshot as a file in Windows 10?
Capturing a screenshot on your MSI laptop is a breeze with the Windows + Print Screen shortcut. By simply holding down the Windows logo key and tapping the Print Screen (Prt Sc) key, you can effortlessly save your screen. If you’re seeking different methods, we’ve outlined four techniques for screenshotting on MSI laptops. Among these, TweakShot Screen Capture stands out as an exceptionally user-friendly and efficient option. If you’re familiar with or prefer other screenshot tools, feel free to drop your insights and recommendations in the comment section below!

